Showing posts with label Method Playground. Show all posts

Monday, August 30, 2010

Method Playground: Vegetation

A new challenge is up at the Playground: use some form of vegetation on your layout.  I love what the design team did with this one.  Be sure to go check out their creations.


I created those flowers with Tim Holtz's Tattered Florals Sizzix die.  I'll do a tutorial this week while the kiddos are in school, and get it posted here as soon as possible.

Monday, July 26, 2010

Method Playground: all white and a doily

This week's challenge on the Playground is to use all white and a doily on your project.  I love color challenges--totally takes the guess work out of which colors to reach for.  For this one, I went straight to my stash of white papers (which meant going into the archives of my paper supply!), and to my white button stash (which was overflowing).  Here's what I pulled together:
I tacked the trim into a ruffle with some white corsage pins, created a mat with some white paper doilies, and used more trim to cinch a flower.  I'm wishing that I had added some white paint to the edge of the photo (it's a color copy--I don't like to use original vintage photos), and added some paint to the "baby" letters--they have a blue hue to them.  Add that to the to do list!

Monday, July 5, 2010

Mirror, Mirror

Method Playground is back with another challenge for your sweet summer days.  This time, we want you to use something reflective on your layout: mirrors, aluminum foil, reflective paper.  I came up with these two:

 I folded a piece of heavy duty aluminum foil in fourths and ran it through the Big Shot with a Cuttlebug embossing folder.  I wanted to add some alcohol ink, but I didn't have the right colors--next time!

 
I used the adorable Crystal Wilkerson kit on this LO (with a bit of MME thrown in).  I used small round mirrors from the craft store as accents.

Hope you can grab some time to join us on the Playground for this round.  Link up your projects here.

Monday, June 14, 2010

Method Playground: Borders

The challenge over at the Playground this week is to use borders on your LO.  You could use punches, stickers, rub-ons, die cuts, or be lazy like me and cut apart a sheet of patterned paper to create some borders (like the ever fabulous Cosmo Cricket Ribbon Sandwich paper from the Early Bird line).
And then if you're really lazy, you'll pair this challenge up with a sketch .

Be sure to head over to Method Playground to see the rest of the DT's fantastic designs.  And then play along with us by linking up your project in the comments.  Who knows, you might win a fabulous prize that I am now pining for!  Go, check it out!  You have until the 27th of June.

Monday, May 24, 2010

Method Playground: Vintage

The challenge over at Method Playground is to go for the old.  Use vintage embellies, tea-stain your papers, or try your hand at waxwork.  Here's my design:
This is not my typical style, but I had so much fun putting this page together: going really girlie and just layering it on.  I started with a color-copy of a photo of my grandmother that we unearthed after she passed away a few years ago.  A good friend scored some vintage doilies, buttons and handwritten letters at Brimfield Flea Market, and I still had some trim left from my trip their last summer.  I spritzed the background with 7 Gypsies Paper Dye in a mix of pastel pink and walnut scarlet.  The book-page flower is from a tutorial over at Scrapbook Heaven.  As I was laying out the page, I glanced down to see my grandmother's name right there in the lower corner of the letter.  So perfect!  Finished the LO with a zig zag stitch to frame it.
The details: vintage doily, vintage letter, beaded hat pin, Prima flowers with rhinestone centers, handmade flower with pearl center, silk flower with vintage button center, Martha Stewart butterfly punch, pearl string glued in shape of heart.

Be sure to head on over to the Playground to be wowed by the other DT creations.  And join in on the vintage fun for your next project.  Link it up by next Monday, May 31.

Tuesday, May 4, 2010

Method Playground: Fill your Pockets

It's my turn to host the challenge at the Playground.  So...I'm challenging you to create a LO with a divided page protector, like the kinds used in photo albums, or to store stickers, or trading cards. 
The layout design is already set for you.  All you have to do is fill up those pockets.  Use photos, patterned paper, mini works of art (like ATC's), memorabilia like maps, brochures, napkins, business cards, whatever!  Once you've filled your pockets, then lay some embellies on top of the protector.  Here's where you can get a little 3-d: flowers, epoxy stickers, brads, chipboard, again, whatever you can think of.  When you've finished your creation, don't forget to link it up at the Playground for a chance to win a RAK from me.

Monday, April 19, 2010

Office Supplies: Method Playground

This week on the Playground we're raiding our desk drawers for embellishments.  The challenge is to use office supplies on your projects.
Making the page a first day of school LO was a no-brainer.  I started the process by gathering supplies: manilla folder, graph paper, stapler, paper clips, a mini binder clip, shipping tag, some sticky labels, metal rimmed tag, and an index card.  Then I pulled out some office-y scrapbooking supplies: alpha stickers, alpha ribbon and a second coordinating ribbon, and a library card stamp, and a spiral edge punch.  After choosing, editing, and resizing my photos (2- 2x2's, 2x3, 3x4, and 3 1/2x5), the page just built itself.  The hardest part was finding the darn notebook where I had jotted down the conversation I had with Camden when he came home from his first day of first grade.  It's written on the index card and reads:
me: Tell me about your day!? 
you: One thing.  I hated it. 
me: Why?? 
you: Because I miss you.  I think about you and I miss you.  It was such a long day and they worked my butt off!

Monday, April 5, 2010

Method Playground: Flowers! {eta video tute!}

Spring has sprung at the Playground, and flowers are blooming all over our projects.
I created a pretty little bloom from a remnant of lacey crochet and a scrap of patterned paper.  Here's how:
Cut a length of lace (10-12") and fold in half down the length.

Join the two ends together and stitch (I used my machine for this).

Turn the circle inside out so the ends are on the inside of the ring as shown.

Thread a needle and knot the end.  Beginning at the seam you created, use a running stitch and stitch along the folded edge of the lace pulling tightly into a gather as you go.

Pull tightly into a gathered bunch and knot by tying the beginning and ending threads together tightly. 

Flatten the circle and voila! A beautiful ruffled circle to attach to your next project.
I'm going to try a quick video tute on the paper roses, and if it works out, I will post a link here.  Crossing fingers!
Be sure to check out the DT's amazing creations for lots more inspiration, and then get some flowers blooming on your projects!  Have fun!!

Monday, March 22, 2010

Method Playground: Cardboard

This week, Amanda is asking us to think OF the box and use cardboard on our pages. I used cardboard to create some flower embellishments for this Easter LO. I spray painted die cut flowers (Sizzix Flower Layers #3), and then peeled back some of the paper to reveal the corrugated cardboard beneath. I added a touch more of paint with some swipes of a dry brush, and glued on button centers. Easy and inexpensive embellies.

Monday, March 15, 2010

A mish-mash of Bloggie catch-up-ness

My, how time flies when you're taking an unplanned break! Didn't really mean to be on hiatus this long. Didn't really mean to be on hiatus at all, truth be told, but sometimes one day turns into the next, and then on into a week, and well here we are. So let's move on to the crafty stuff I've been up to lately, shall we?
First, Method Playground's challenge is in full swing. This week: use white out on your layout: use it as you would paint, to distress, as a spot for your journaling, to accent patterned paper, to edge your photos or your papers. For my very simple LO, I wrote the letters of my title using white out tape and wrote my journaling along some lines of tape. Check out what the rest of the DT did here.

Did a little sewing last week and whipped up this little tooth fairy pillow from an old blue jean pocket. With three boys, I am never at a loss for jeans with holes in the knees. I never throw them away, so have collected quite a stash of them. It's a thrill to come up with a project that uses bits of blue jeans. The pillow is sewn out of super soft fleece, and the pattern for the tooth is from a pattern created by this chicita (as seen in this sewing calendar that I {heart}.)

Perhaps the reason I've not been creating very many layouts lately can be blamed on my new passion for crochet. Oh, how I am so in love with this new crafty form. The projects whip up so, so quickly (which makes impatient me very happy), and the look of crochet can be so varied. I was on a mission last week to scout out some free patterns on the web and here's a couple that I found and used:

My first go at this hat was not pretty (somehow in joining each round I was increasing the number of stitches resulting in this point that stuck way out at the back of the hat). I tore the whole thing out and carefully counted each row to keep it in check. The hat took only about 3 hours. (Did I mention how much I love crochet?!) I haven't permanently attched the flower yet because I'm on the fence about adding a third color and layer to it.

[Here's the link to the hat and flower pattern. Note to self: bookmark all patterns so I can share them]

The pattern for this cuff is from Crochet Me. I love these 8-petal flowers. I'm going to make some more and stitch them together for a headband.

Well, that's my craftyness for now. It's good to be back!

Monday, February 22, 2010

Method Playground: Heat Embossing

This week on the Playground it's all about keeping warm . . . with heat embossing. I rifled through the ol' scrap paper box and used some SU! background stamps to emboss over the existing patterns in the paper. A super simple layout (my oldest said, "That's it, Mom? Three papers and a word? That's silly!") I'm dedicating this page to all those who think scrapbooking has to be complicated and time-consuming. Anyone can do a page like this. Anyone.

My feeble attempt at capturing the texture of the embossing.

Monday, February 8, 2010

Method Playground: Ruffles

As you know, I will look for any reason to *girl up* my layouts, and this week's challenge on the Playground was the perfect excuse: ruffles! It was also the perfect excuse to learn something I've been wanting to try: gathering fabric into ruffles. I found a great tutorial on line (of course!), and couldn't believe what a *cinch* it was.

Here's the how-to:

  1. Cut your fabric into a strip. Mine is about 1 1/2" by 30"

  2. Use your sewing machne to sew two lines down the length of the strip close to the edge, being careful not to et the lines cross over each other.

  3. At one end, tie the two back thread (from the bobbin) together.

  4. At the other end, begin pulling on the bobbin ends and gently sliding the fabric along the thread to gather.

To create the flower, use a narrower and shorter length of fabric (mine is about 1/2" by 6", but I would make it more like 12") and follow the same instructions for gathering. Once ruffled, stitch the two ends of the strips to each other and flatten to create a circle.


Could it get any easier?! Give it a try to girlie-up your next layout, and post your creations at Method Playground. And here's one more link to give you some inspiration for your project: ruffled flowers.


This layout uses a sketch from My Sketch World.
Wednesday, January 27, 2010

Method Playground: Felt

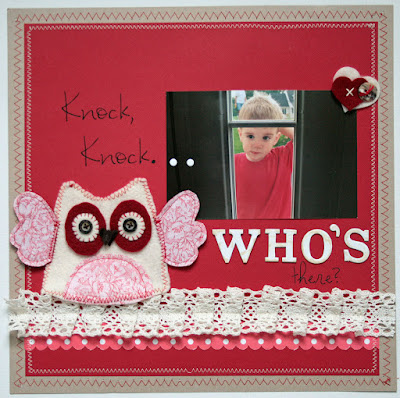
It's time for another challenge over on the Playground. This week, Miwako is asking us to play with felt. I used some felt and fabric to create this cutie owl embellishment for my page. The pattern for him came from a sewing project calendar I picked up to help with my 20-ten resolution to sew more. You can find the pattern here.
So fly on over to Method Playground and link up your felt creations.

Monday, January 11, 2010

Method Playground: Go Green!

I am the host of this week's challenge over at the Playground: upcycle something on your layout or project. There are lots of possibilities for this one: packaging materials, junk mail, newspapers, magazines, boxes, styrofoam, old books, catalogues. If it's destined for the trash (or recycle bin), use it on your project and post a link to it in the comments at Method Playground. Be sure to check out the amazing artwork created by the design team.

Here are my layouts:

I placed drops of alcohol ink onto the packaging from some Basic Grey magnetic snaps. After it dried, I doodled some swirls with a Sharpie pen and adhered it to my page.

The large bracket on this LO is cut from a Panera Bread coffee cozy--love the texture on these. And the tree is made from a scrap of cellophane packaging from a pack of stickers. Here's how:

  1. stamp with Versamark ink onto the cellophane.
  2. swirl gently with a brush dipped in metallic pigment powders (I used sparkle gold Pearl-X powders)
  3. spray with a fixative like Krylon Workable Fixatif
  4. adhere to LO with a brad or staple

I also never toss the background sheets to stickers. The negative spaces can be fussy cut, or used as a mask for painting or misting (just be sure to lessen the adhesive by sticking it to some fabric a few times--learned this the hard way!). And pages of old, torn books make great material to punch and die cut.

Be sure to play along with us. You have until Monday, January 25th to link up your project in the comments at Method Playground for a chance to win a camera strap sewn by me.

Wednesday, December 30, 2009

Method Playground: Rock Star

This week's challenge at the Playground is to *Make It Messy*. You don't have to tell me twice to get messy (it goes back to my mud-pie-making-days!) For this one, I started of with a piece of raw canvas (from Dixie Pieces' October kit).
Squirted on a few blobs of paint in teal, turquoise, gold, and lime.

With a large bristle brush, I swirled the paint all over, adding more paint as needed.

Once dry (I stink at the waiting part), I used a Sharpie to add in some text. I used big, bold bubble letters to add to the graffiti look I was going for here.

A few doodles and words (rock on! and kick it) and a bit of paint in the bubble lettersOriginally I was going to use a smaller photo, but changed my mind to a 4x6, so the star got covered up.

I forgot to take pictures of this part, but I squirted some spray paint in white, blue and orange, some from a distance and some super close (I lifted the canvas to let the splotches drip).

A machine stitched border and some stitching around the photo finishes the page. My son wants to frame it and hang it in his new *Rock Star* bedroom.

Get out your paints, mists, coffee, spray paint, food coloring--whatever, get messy and link up on the Playground. Have fun!

Monday, November 30, 2009

A visit with the Easter Bunny

I know this LO is a bit seasonally inappropriate, but the photos fit the design of the page. This week's challenge on the Playground is using negative space (the space around and between an image). This can be the backing to chipboard pieces, sticker sheets, stencils, the leftover from a diecut. Originally, I was thinking of using the negative space as a mask, but let's just say that pairing a way too sticky sticker sheet (even after I rubbed it onto my denim jeans repeatedly) with homemade glimmer mist (which gobbed up my mini-mister and turned it into a mini-dripper) just did not go well.
Onto plan B: a sheet of chipboard left from SU! On Board Lots of Letters. I trimmed it down to 8x8, painted it with two shades of green paint, and filled the 1 3/4" circles with photos, papers, and embellies.


What can you create with the negative space you've got laying around? Whip something up and post it at Method Playground by Monday, Dec. 14 for a chance at a RAK from Amanda.

Tuesday, November 17, 2009

Method Playground

This week's Method Playground challenge is to use ribbon for your title. There are SO many ways to interpret this challenge.

For my LO, I ran some wide ribbon through my Big Shot, and handcut some into letters. Go check out what the Playground Girls did for their pages, then give it a try on your next layout. Don't forget to leave a comment at MP with a link to your page to be entered into a drawing for a RAK.

Tuesday, November 3, 2009

Hotel Pool: Method Playground challenge

This week's Method Playground challenge is all about magazine inspiration. I love thumbing through magazines and catalogs and tearing out bits of inspiration from advertisements or drawing up a quick sketch based on a magazine layout.
Here is my inspiration piece from a baby boutique guide I picked up when I was pregnant with baby #3. I tore out quite a few of the ads from this to add to my inspiration binder.

I love the playful overlapping circles and the happy combination of colors. Here's my take:

The page is built on a gessoed piece of duck cloth canvas. I love working with this fabric. It's sturdy like cardstock, but takes the paint and stitching a bit better than paper.

So how about you? What magazines or catalogs will inspire your next layout? Give it a try and don't forget to post it on the Playground (I heard there may be a rocking RAK up for grabs--just a little inside scoop for you!)

Monday, October 19, 2009

Method Challenge #53

This week's challenge is up at MP: make your own patterned paper. They're flashing back to their first challenge ever (you can check that one out here). The girls at the Playground really hit it out of the park!

Here's my take:

Guess I was a bit indecisive about which technique to use to create my paper, so I tried out a little bit of everything. Hop on over to the Playground and play along with us! You have until November 1st to link up your LO.

Tuesday, October 13, 2009

Can't wait to have a ball on the Playground!!

I am thrilled to pieces, tickled pink, happy as a clam, and pleased as punch to be a member of this uber talented Design Team.  Be sure to come by the Playground for challenges posted every other Monday.  See you there!