I was at a complete loss for a card to make for my nephew's First Communion. I don't have any religious stamps or embellishments, and was beginning to think I should have bought a card. I did, however, have a small cross punch. By adding the additional punched circles and squares, I was able to beef up the tiny cross and create a focal point embellishment.
Try creating an embellishment by layering something small and use it on your next scrapbook page or card.Saturday, February 28, 2009
Wednesday, February 18, 2009
Color Challenge
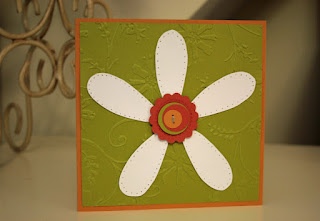
Here is my card done with KWerner's Color Challenge. This is a great prompt to get the creativity flowing. Instead of a card, you could use the colors to create a scrapbook page or a painting, or any other project you can think of. And in addition to the colors in this Inspiration, I used the flower motif, as well.
And a close-up of the texture created with the Cuttlebug template:
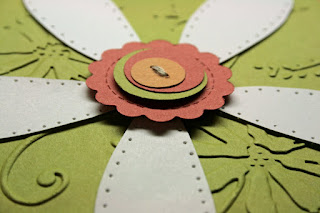
I may add a little greeting word as a tag hanging from the flower's center (or maybe I won't).
Thanks for looking, here's The How-to:

And a close-up of the texture created with the Cuttlebug template:

I may add a little greeting word as a tag hanging from the flower's center (or maybe I won't).
Thanks for looking, here's The How-to:
- Stamp the petals from SU! "Pick a Petal" set in light colored ink on Whisper White. Cut out, and flip over so only the white shows.
- Use a paper piercer and mat to pierce the border of each petal.
- Cut More Mustard to 5 1/4 x 10 1/2 and fold in half.
- Cut Kiwi Kiss to 5" sq. and run through Big Shot with Cuttlebug "Stylized Flowers" embossing folder. Adhere to card base.
- Punch Kiwi Kiss, Really Rust, and More Mustard with 7/8", 3/4", and 1/2" circle punches respectively. Glue together (I liked how the pieces looked when I haphazardly layered them so I kept the look by gluing them this way).
- Use paper piercer to poke holes through circle piece and thread with Linen Thread.
- Cut small scallop circle from Really Rust using Birds and Blooms Sizzlit and Big Shot. Adhere sewn circles to scallop with Dimensionals foam.
- Adhere petals in flower arrangement on embossed Kiwi Kiss.
- Adhere center with Dimensionals foam.
Tuesday, February 17, 2009
Sketch Book
I hit Target today to see what kind of post-Valentine deals I could snag (I have a thing for hitting the 50% off sales that always follow holidays). I was hoping they would still have some of the vinyl placemats (that I had already picked up for full-price) on sale so I would not feel so guilty when I hacked them to bits. Lucky me found them barely out of sight on a top shelf. Brought them home and set the boys up with something to do and set to work creating this:
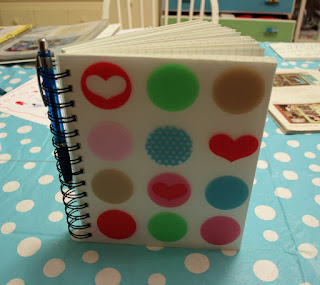

I thought I would be able to cut through the vinyl with my rotary cutter and quilting mat--not so much. So I had to resort to marking a line with a pen and cutting by hand--yikes! I cleaned up the edges a bit with my Purple Cow trimmer (oh how I love that trimmer). I alternated the inside pages between a heavy-weight watercolor paper (so I can use inks, pens, and paints) and graph paper which I love for drafting sketches so you can draw to scale. A quick punch with the Bind-it-All, and poof, a handmade journal that's durable enough to be tossed into a bag and carted everywhere inspiration may strike. Oh yeah, the front and back covers are made with the placemat, in case that wasn't clear.
Monday, February 16, 2009
Photo Process
I've been thinking a lot about my process for organizing and scrapping my photos lately. Maybe it's my New Year's resolution to redo my organizational system for my digital photos or the current issue of CK all about organization, but I drew up a plan tonight of my process. I'm sharing it with you in case you want some of the ideas, and also so I have a place to refer to it as I work. I'll try and keep this brief; here goes:
- Download photos from camera to computer and organize them by date and topic {i.e. Feb 14-Eating Chocolate} and file into appropriate year folder.
- Back up new photos to external hard drive (very important!! and not something I have been good about doing, but can you imagine?)
- While going through new photos, jot down notes/journaling into sketch book and draw sketch to go with photos. Use magazines or the internet for inspiration. Put as much detail regarding photos sizes, color schemes, materials, etc. as possible.
- Print photos in appropriate sizes for scrapbook pages.
- Send other photos you love to printer in sizes desired (another thing I'm not good at doing, but who needs to spend hundreds on works of art for the walls, when some gorgeous photographs of people you love enlarged, matted, and framed would be way better?)
So there it is, the system I am starting to use to keep a handle on my photos and scrapbook more pages. The sketch book is key and the more detail the better, so that when you sit down to create a page all the thinking is already done for you.
How do you keep up with your photos, or what advice do you have for making use of your creative time?
Thursday, February 12, 2009
Fat Free Cupcakes

This little confection was so much fun to make and looks good enough to eat.
Here are the specs--The Stuff: two patterned papers, paper crimper, styrofoam ball (mine is 2 1/2"), three circle punches: 1 3/8", 1 1/4", 1", glue gun
The How:
- Cut a strip of patterned paper 1 1/4" x 9" and run through crimper to form cupcake wrapper.
- Use glue gun to fix this to the bottom third of the 2 1/2" ball.
- Punch circles in three different sizes: start with largest circle on the bottom and glue gun the top of each circle to the styrofoam ball slightly overlapping the side edges as you go (gluing just the top allows the rest of the circle to flair out for dimension).
- For the next layer, use the middle-sized circle. For the top layers use the small circle.
- Top with a pompom cherry if desired.
Saturday, February 7, 2009
Monkey Mustache
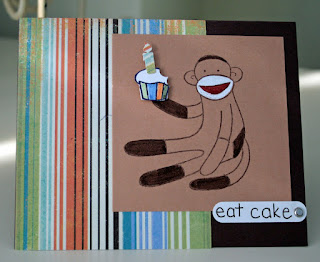
A quick card for a friend's birthday. I just can't get enough of this cute little monkey. I've always paper pieced him, but pressed for time this morning, I used markers to add a bit of color. After coloring his mouth white, I thought of a frosting mustache. So, a couple of bite marks made with a 1/4" circle punch, and voila--a little monkey who loves to "eat cake!"
Friday, February 6, 2009
Baby Cards
This card was made with the wrapping paper used to wrap the gift. Can't get much more coordinated than that!
Here's the How-To:
For the card base: fold card stock in half to form the card and use a glue stick to adhere piece of wrapping paper to the front. Die cut scallop circle on the fold using Sizzix.
For the flower: fussy cut two layers of flowers from the wrapping paper. Apply 2 coats of Mod Podge Brushstroke medium to each flower and allow to dry. Layer flowers and sew button into center with floss. Adhere stamped vellum tag.
This card base is made from a piece of patterned cardstock. The elephant and flowers were already there, so all that's left is to embellish. A stamped scallop circle tied with ribbon and a few strips of patterned paper from the same collection: a 10 minute creation!
Wednesday, February 4, 2009
Whooo loves ya, baby!
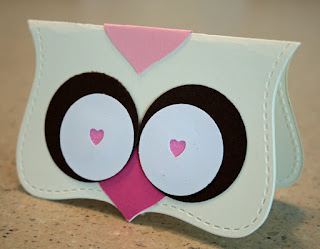 Ok, that's not really what I'll be putting on the inside of these Valentines for the boys' classes. Actually, I haven't come up with that part, yet. These little cuties are made from the Stampin' Up! exclusive Sizzix Top Note Bigz die. Simply fold the Top Note in half and embellish with hearts (crest and beak, also from Sizzix), and circles (1" and 1 3/8"). For a little more love, I added hearts for the pupils by punching with a mini punch and backing with colored paper. This is the girl color scheme (pink & brown). The boys will get red & black. These open with Velcro and hold a coupon for a free ice cream from Friendly's inside.
Let me know if you have any ideas for a message using the pun Owl (I will) or Whooo.
February Scrapbook Club Layouts
Simply Scrappin' Kit: I Wish
The "I Wish" SSKit is perfect for Christmas memories. From Christmas morning to visits with Santa, holiday parties to traditions and preparations, the papers, colors, and embellishments will help you create holiday pages.
Layout # 1
This layout includes 7 photos, a place for journaling, and supporting word embellishments. The focal photo is 4x6 and matted. The other photos on the left page are 4" square. The top two photos on the right page are (from l-r) 5x4 and 3.375x5.5. On the bottom they are 3.75x3 and 3x3.
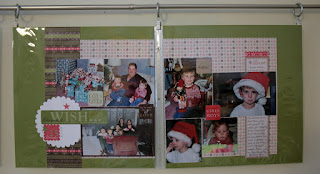
Layout #2:
This layout includes 6 photos: 4-2x3 and 2-4x6 in a simple, clean design.
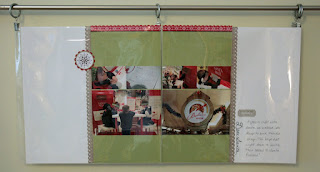
The "I Wish" SSKit is perfect for Christmas memories. From Christmas morning to visits with Santa, holiday parties to traditions and preparations, the papers, colors, and embellishments will help you create holiday pages.
Layout # 1
This layout includes 7 photos, a place for journaling, and supporting word embellishments. The focal photo is 4x6 and matted. The other photos on the left page are 4" square. The top two photos on the right page are (from l-r) 5x4 and 3.375x5.5. On the bottom they are 3.75x3 and 3x3.

Layout #2:
This layout includes 6 photos: 4-2x3 and 2-4x6 in a simple, clean design.

Monday, February 2, 2009
Add this to the To Do list
Subscribe to:
Comments (Atom)


