Monday, May 23, 2011

Square-a-Day: one week of catch-up

Wow, have I really fallen this far behind?  My squares are coming right along, it's the rest of the posting process that hangs me up!  Here we go:

Lemony Lime Citrus by SmoothFox {pattern here}
This was a fun one, and I love the little arches that showed up in the corners on the green round.
Starburst Flower by SmoothFox {pattern here}
Can you tell I had run out of blue yarn when I made this one?!  The starburst came out bigger than I thought it would, so I didn't have room to add any blue or white.  This is another one I would like to make in its full 12" size.  Hmm do I feel another blanket coming on?

Ladybug Square by Amelia Beebe {pattern here}
Honestly, this was one square I thought I would be ditching--just didn't think I wanted a ladybug on my blanket.  But it just might be one of my favorites.  And I think it will add jut the right touch of whimsy!  I used french knots for the spots--so fun!

Eye of the Beholder by Jessica Gil {pattern here}
This one went really quickly.  I'm sad that my smaller size omitted the little stripes of color between the outer rows.

George's Granny by Jessica Gil {pattern here}
Another super fast square, and I love how easy Jessica's pattern's are to follow.

And last but not least:
Impossible Hexagon by Stramenda {pattern here}
I had such high hopes for this one, but it was made to be a 12 incher, and I lost the beautiful effect of the lace work of the white.  I only did two rounds of the lacy white part (rounds 5 & 6), and when I skipped down to round 9 it all went wonky.  I'm going to do this one again as a 12 incher--it would make a beautiful accent pillow cover.

Haven't started today's square yet, but I'll be back later in the week with more squares.  Wish me luck!

Sunday, May 22, 2011

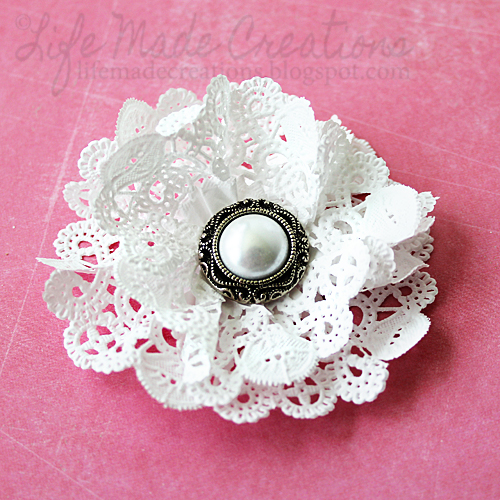
Doily Flowers

Here's my last flower tute from the crop.  Hope you had fun!

Doily Flowers
Doilies are one of my favorite embellishments for paper crafts. They're inexpensive and you can use them in a variety of ways. This flower is a "cinch" to make and can be done in a "pinch"--literally!

I used two 4" doilies for my blooms.  Cinch up the center of each doily, one just a bit more than the other.


Adhere the smaller, more pinched doily to the top of the larger, less pinched doily.  
Adhere a pretty button or other embellishment to the center.
See, told you it was easy!


You have until May 29th to link up your creation in the forum to be entered in the prize drawing!

Saturday, May 21, 2011

Fabric Flowers

Here's another flower from the Scrapbook Heaven Garden Party Crop.  Stop by to see all the blooms!

Fabric Flowers
These simple flowers are popping up all over the place.  They're super easy and can be made with any material, from fabric, to paper, to ribbon, to rick rack, to crepe paper, and beyond.

For this project, I used plain white muslin. I like to tear the fabric, rather than cut it, to create a frayed edge resulting in a more shabby chic flower. I also used some homemade mist to dye the fabric.

First, mist the strip with plain water, then mist with the ink (this helps the dye to run on the fabric and gives more coverage with less dye).

Tie a knot at one end of the strip (this will be the bud at the flower's center)

Working in a circle, twist and turn the strip of fabric around the center. I like to keep my petals loose, but play with the tension to create different looks. If you're more of a visual learner, Rhonna Farrer does a fantastic video here.

When you get the fabric the way you like it, glue it to a circle of felt or cardstock to hold it together. Hot glue or fabric glue work well.

The fun part is coming up with ways to embellish your flower centers: buttons, medallions, old costume jewelry. For mine, I used pearl tipped pins.


Have fun, and remember to link up your project here before the 29th to be entered to win a prize!

Friday, May 20, 2011

3-D Flower Baubles : A tutorial

There's a party going on at Scrapbook Heaven this weekend.  We're having a Garden Party!  Stop on by the forum and learn how to make some pretty blooms for your projects.  I've scheduled the three flower projects I created to post each day this weekend.  To see the fantastic flowers from the rest of the DT, head on over to The Forum.  You have until the 29th of May to link up your project to be eligible for some great prizes.
3-D Bauble Flowers
A while back I made little paper baubles for a garland.
This technique works on that same idea.

The how-to:
  1.  Punch or die cut a symmetrical shape. (flower, heart, circle, etc)
  2. Fold each shape in half (a scoring tool helps get your folds nice and crisp).
  3. Simply glue each punched piece to the next, lining up along the folds. I used 4 punchies, but experiment with more to get a fuller look.
  4. Adhere the back flaps to your project and you're done!

The best part: the baubles fold flat for card shipping. 
These make great scrapbook embellies for framed layouts, too.

And a close up:

Monday, May 16, 2011

Pinspired: The Printer's Tray

Hello, my name is Michelle and I am addicted to Pinterest.  When I am in front of my computer working, I can't help but click on the little Pinterest/Home bookmark...a lot.  I've been pinning and browsing and pinning some more.  I know someday these pins are going to come in handy, and my new mantra is "Time spent Pinning is time well spent."

So last week, I finally put some pins to good use and refinished the printers tray I've been holding onto for a few years.

First my "Pinspiration":

And here's mine, or should I say my boys':
You can see all of my pins here.  And if you're on Pinterest, let me know so I can check you out, too!