Wednesday, October 30, 2013

giveaway: rainbow loom book

Winner = Carrie Mclean!
view the drawing here

A couple of weeks ago I was contacted by Fox Chapel Publishing and asked if I would host a giveaway on my blog for Design Originals new book:

Totally Awesome Rubber Band Jewelry

My boys recently caught onto the Rainbow Loom craze and were using their fingers to craft bracelets for themselves, their friends, and their family.  They were beyond excited when a copy of this book arrived in our mailbox.

We picked up a loom so they could try out some of the bracelet styles pictured in the book.
They loved it!  This full-color book is fun and engaging for little (and big!) bracelet makers.
Some of the fun designs included in the book.
First, they flipped through the 48-page book to choose a project.  The brightly colored and doodled layouts are packed with jewelry-making info and tips.
Once they settled on their design (of course it was the Starburst Bracelet on pg. 34), they choose the number of bands needed from the "What You'll Need" list, and set to work loading the loom following the "Load It Up!" diagram that accompanies each loom project.  Each band is numbered on the diagram making it easy to follow.  As long as you load the loom in numerical order you'll have a fun and funky bracelet (my son had to learn this the hard way!).  They also provide "Load It Up!" diagrams for alternate color schemes.
A bracelet made by boy #2 for his aunt.
Next comes the sometimes tricky part of hooking the bracelet.  The book makes this part easy by providing detailed step-by-step photos along with written instructions for how to "Get Loopin'."  There are also directions for finishing your bracelets, as well as projects other than bracelets, such as earrings, a flower charm, a belt, and more.
My little guy designed and made this one.
You can take a peek at the book in the preview below:  


The boys and I loved making some of the bracelets in this fun new book and the nice peeps at Fox Chapel sent me an extra copy of the book to giveaway on my blog.  
To enter, leave a comment on this post telling me how crazy the kids in your life are for this rubber band jewelry.  I will pick one random winner on Saturday, November 9th.  
Due to shipping costs, this giveaway is open to addresses in US and Canada only, please.  Thanks so much for understanding!

cards in the round

Hello crafty friends!

Geesh it's a miracle these days if I can get on this little old blog.  Wish I could say that it's because I've been busy in the studio doing all kinds of crafty projects.  But.  Nope.  It's not.

We have been spending a bunch of time at the rink {like 62 times this month to be exact}.  
I will never complain.  I am grateful for this sport: grateful that all 3 boys love it fiercely, grateful for the exercise and healthy lifestyle it provides them, grateful that they are healthy enough to play a sport, grateful for the friendships they have made on the rink that carry over to off the ice, grateful for the bonding that happens between them when they play hockey in the basement, in the driveway, or while sitting on the couch watching the Bruins game.
And I never tire of watching them take to the ice.

Hockey aside, I do have some cards to share with you today.  All three of them were made with the Top Dog Dies Circle Mini Album Die as their base.

To create the folded card base from this type of die, simply fold your card stock and line up the folded edge just inside the cutting line's edge.  This keeps the fold intact so that it opens like a card.


Floral swags are hot right now.  This one can be found here in the Silhouette online store.  A bow and a doily with a simple stamped sentiment finish off this card easily.

Another thing that has been trending for a while now is pie charts.  Inspired by Sara McLachlan's song "Ice Cream, I cut the pie chart shapes from a freebie cut file from the always adorable Juliana Michaels.  You can download yours here.  Check out her other fantastic die cut downloads on her blog, too.

Lastly, I have a cute little spinner card.  I used my new sketch pens for the Silhouette Cameo to write the text on the spinner.  The little shapes are a mix of patterned papers and some Stampin' Up! stamps.  By taking elements from Juliana's pie chart cut shared above, and this spinner cut from Silhouette (the arrow and the scallop circle), I was able to design a fun and interactive birthday card.

I'm kinda in love with the circle shape as a card base.  So many possibilities from one die cut shape.

Thanks for stopping by!

Friday, October 11, 2013

top dog dies -- mason jar sewing kit

Happy Friday!
Today I have a little Mason Jar gift to share with you.  

I used Top Dog Dies Sew Much Fun die set (did I tell you how much I love that die set?!), the Darby Doily & Tags die set  and the Madison Border die to embellish a mason jar.

The pin cushion top:

Inside I included some pretty vintage buttons, a couple of spools of thread, some scissors, and a few sewing needles.

And just like that you have a sweet little gift.

That Madison Border die also makes a cute little votive holder wrap when cut from vellum and tied with a bow:


Thanks so much for joining me this week as I shared the projects I created for Top Dog Dies.  I hope you check out their site and fabulous line of dies.

Right now you can earn double reward points on your orders placed through October 20th.  And when you sign up for their rewards program (it's FREE!), they'll give you 400 points right off the bat that you can use off your first order {details here}. Also, your order of $60 or more ships free in the US.

Thursday, October 10, 2013

top dog dies--gift holders

It's already day 4 of our week-long Top Dog Dies launch party.  
Today, I have two gift holders for you.

This first one uses that cute Sew Much Fun die I love so much.  I used a regular doily as a sleeve for a Project Life card from the Fifth and Frolic set.  

The card is embellished with the dress form shape from the Sew Much Fun die set and the gift card is inserted into slits on the back of the card.

Then the whole thing is wrapped with the Madison Border die (trimmed down a bit) and embellished with a banner greeting and mini clothes clip.


 This little cutie is one of my favorites and is perfect for holding any little treat you want to give (in my case, chocolate chip cookies!)

She's so easy to put together, too.

Cut the base using the Frame Front Square Card die and fold the frame portion in half to create an owl head shape.

The wings are cut from the Darby Doily and Tags die set and folded in half on the diagonal.

Embellish the owl's face as desired, fill a glassine bag with treats and she's ready to give to someone special.  I'm thinking these would be adorable Valentine gifts.  Or how about a penguin based on the same concept and used as place markers/favors at the holiday table.

Thanks so much for stopping by!
There are two more projects left to share.  How much do you love mason jars?!

Wednesday, October 9, 2013

top dog dies--two cards

Today I have a couple of cards to share with you using some Top Dog Dies.


TDD dies make easy work of fancy card making.  This card only took about 20 minutes to put together using these three dies (click on picture to go shopping):
Frame Front Square Card die TW044
Darby Doily & Tags die set TC025

Birds and Nest TC034

To create the multi-colored bird and nest embellishment, cut the entire die twice, once in brown for the base layer, once in green for the leaves.  Then use tiny bits of colored paper to cut the birds and nest in one pass through the die-cutter.

Trim the pieces and assemble onto brown base:


Outside reads: "Congratulations on your new nest."
Inside the card:

The second card was even simpler and quicker to make.
Using the Snowflake Trio die set  and a portion of this die,
Madison Broder die TC020

I whipped up this card in no time

 The intricate details these dies can cut is simply amazing!

And I love the little dots and dashes added to the die to create texture.

Thanks so much for letting me share my projects with you.  
Tomorrow I have a couple of gift holders to show you.

Tuesday, October 8, 2013

embroidering with dies

I am so excited to share this idea with you! 
I happened upon a little discovery that marries die cutting and embroidery--a match made in heaven, right?  And what's even better: this little discovery eliminates the need to trace or otherwise transfer patterns from paper to cloth.


You will need:
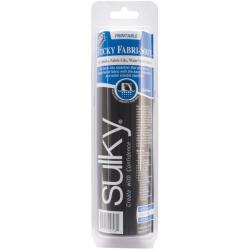
Sulky Sticky Fabri-Solvy
A pretty little die like this one from Top Dog Dies
Snowflake Trio die set TC015
I learned about the Fabri-Solvy material from embroidery queen Wild Olive in this post.  So I picked up a roll to try it out the way she described.  Then I received my box of goodies from Top Dog Dies.  Hmmm...I wonder...Can you hear the wheels of creativity turning?

Here's what you do:
To cut the Sulky material, place the fabric side towards the die cutting edge (paper side touching the cutting mat) and run it through your die cutter.

Using a pin or needle, weed out the cut pieces from the die cut piece while it is still in the die:

When it is all weeded like this

carefully remove the Fabri-Solvy from the die, peel off the paper backing to reveal the sticky side, and adhere it to your fabric.

Stick it in your hoop, and begin embroidering in the negative die cut spaces.


When you're finished stitching, simply peel off the Fabri-Solvy and admire your creation.  Sew easy!

I only embroidered inside the negative cut outs for this design, but I think this technique would work for a variety of die designs because you could stitch the outlines of the shapes.  You can even stitch through the Sulky material to add details to your project.

I hope you will give this a try.
Thanks for visiting!

Monday, October 7, 2013

top dog dies: sewing canvas

When I received my shipment of dies from Top Dog Dies, I was so excited to get started playing.
I immediately got to work with some sketches for project ideas.


And as soon as I saw this die set,
Top Dog Dies: Sew Much Fun die set TC019
I knew I wanted to make a little canvas for my friend's new sewing room in her newly renovated 1800's home.

I prepared the background with some gesso and used bubble wrap to "stamp" some pink dots.

Then I die cut the shapes using mostly papers from American Crafts' Dear Lizzy line.
I am amazed at how detailed the Top Dog Dies cut.

Then came the fun part of arranging the pieces to fit.

Some bits of floss and baker's twine, some ribbon, and a few brads to embellish it all.
I wrapped the canvas edge in washi tape, and dressed up the back with more washi and a piece of patterned paper.

 A cute little canvas to adorn her sewing room wall!

 Thanks for visiting!  I'll be back tomorrow with a super easy way to use dies for your embroidery projects.

ps. This little project is currently featured on the home page of the Top Dog Dies website!


Saturday, October 5, 2013

top dog dies

Just popping in to share a bit of news.
It's here!--AccuCut's brand new online store:

They are not only carrying their own line of intricate-cut, wafer-thin dies and large steel-rule dies, but also many popular styles from well-known brands.

Go check out their new site at

www.topdogdies.com


This is the new company I am so grateful to be designing for.
I can't wait to share the projects I created for the launch with you over the next week.

Here are a few sneaks:


This one will be a tutorial.  If you embroider, wait until you see this! 

Have a fantastic weekend!