Showing posts with label sewing. Show all posts

Tuesday, April 1, 2014

purse to camera bag tutorial

Last week, I spent part of one of my days off making some custom-fit padding to turn a purse into a camera bag.  

And now I finally have a moment to share the how-to with you!

It all started with this bag I picked up on sale at Target
Originally,  I thought the front pockets would be perfect for holding lenses.  The problem: this purse lacked any type of padding to protect my little camera from bumps and bruises.
A quick search on Pinterest turned up a few tutorials that seemed easy enough.  Mostly I followed this one from Make It & Love It.

I started off with a trip to my local fabric and craft store to pick up some coordinating fabric, padding, and Velcro.
 The padding I chose is Fairfield's Soft n Crafty NU-Foam premium densified batting.  

Start by cutting a piece of pad to fit the bottom of your bag.  I just lined the pad with the bottom outside of the bag and snipped for the length and width then continued cutting at the snips to cut the entire rectangle.
Then cut a length of pad to fit the entire perimeter of the inside of your bag--I had to cut mine in two sections due to the size of the padding.

Dry fit the pad into your bag and make adjustments if needed.

Next, cut the fabric large enough to cover your pad pieces.  I left a good inch around the edges and cut along a fold to give a nice finished edge (and to have less to sew).

Before you sew the cover of the perimeter pad, you'll want to stitch on your Velcro strips.  I placed the strips (soft side) so they would be on the long sides of my bag and sewed around the entire edges of all four strips.

Fold fabric pieces right sides together and stitch, leaving an opening to turn your fabric and insert the padding.  Do this for both the bottom and side pieces.

To make the dividers, I followed Make It & Love It's directions (and forgot to snap pics!).  I didn't even bother stitching the base to the sides because I'm a lazy hand-stitcher it all stays together snuggly once inside the bag.
This project took under 2 hours (it would have been a lot faster, but my sewing machine and I had a couple of battles and I had to show it who was boss).  I'm thrilled with the result of a cute and trendy camera bag without the boutique price tag {materials: $15 + bag: $20 = total cost: $35}.

Happy Sewing!

Monday, October 7, 2013

top dog dies: sewing canvas

When I received my shipment of dies from Top Dog Dies, I was so excited to get started playing.
I immediately got to work with some sketches for project ideas.


And as soon as I saw this die set,
Top Dog Dies: Sew Much Fun die set TC019
I knew I wanted to make a little canvas for my friend's new sewing room in her newly renovated 1800's home.

I prepared the background with some gesso and used bubble wrap to "stamp" some pink dots.

Then I die cut the shapes using mostly papers from American Crafts' Dear Lizzy line.
I am amazed at how detailed the Top Dog Dies cut.

Then came the fun part of arranging the pieces to fit.

Some bits of floss and baker's twine, some ribbon, and a few brads to embellish it all.
I wrapped the canvas edge in washi tape, and dressed up the back with more washi and a piece of patterned paper.

 A cute little canvas to adorn her sewing room wall!

 Thanks for visiting!  I'll be back tomorrow with a super easy way to use dies for your embroidery projects.

ps. This little project is currently featured on the home page of the Top Dog Dies website!


Friday, July 6, 2012

"Fobulous" key rings


This little project was inspired by these cuties at 


Well, here's how that turned out:

Kind of blah.  I think the little monograms are what make hers so cute, and I was flat running out of time to be cutting and hand stitching felt letters to fabric.

So, I did my best Winnie the Pooh:
Think, think, think...

And came up with this:

Yo-Yo's.  I love them.  I could make them all day long (thanks to this handy little gadget)

I simply stitched two yo-yo's together through their button centers,

slipped a loop of ribbon between them, 

and ran a few stitches on the machine to fasten the ribbon.

Slip in a split ring and a printed tag and they are the perfect little thank you for the classroom assistants.


Wednesday, January 25, 2012

A {handmade} Pillowcase

I have a great artist friend, Tracey, who is an amazing quilter and seamstress.  She is so fantastic for inspiring me with her sewing skills.  So the other day, she invited me over to sew a pillowcase, and with her help I stitched up the most beautiful pillowcase on the face of the planet {so not exaggerating here!}.

See for yourself:

Am I right?  

Well it helps to start out with fabric you love, and then get a perfectly coordinating strip of yellow that your friend just happens to have in her stash, and then have that amazing friend walk you through the pattern (which, by the way, you can find at All People Quilt as part of their 1 Million Pillowcase Challenge) and give you great pointers along the way (like trim down your seam before completing the last length of stitching on the French Seam, and use a pin to pick out the corners to make them square).

Just look at these beautiful French Seams:

I am always amazed at the process of sewing: the way you stack fabric in a certain order and facing a certain way and then bing-bang-boom it magically transposes into the right thing.  I have learned to not over think it, just follow the steps and wait for the magic to happen.


I can't bear to part with this pillowcase, and I need to make one more for my husband's pillow (he will be thrilled, I know).  Then I will whip up one (or three) to send off to someone who could really use a pretty pillowcase.

Wednesday, January 4, 2012

Day 10: Yo-Yo Tree

I have a good friend who celebrates her birthday on December 26th.  When I told my son her birthday his reply was, "Really? She must get tons of presents. {pause for thinking} Wow, she's practically Jesus!"  Kids are so funny!  
This year I made her one of these:

I first discovered a handy dandy yo-yo maker tool in November at a scrapbooking crop.  One of the girls there was whipping up yo-yo's like nobody's business.  I was intrigued and inspired and went right out to purchase one of these little tools for myself.
purchase here
There are so many things you can do with these cute little yo-yo's.

Like this gorgeous yo-yo blanket


Or this fun yo-yo garland
Source: etsy.com via Michelle on Pinterest


Or this beautiful yo-yo embellished pillow
Source: bhg.com via Michelle on Pinterest


And even this cute little yo-yo bracelet

I opted for a bunch of green yo-yo's fastened to a styrofoam tree form with pearl-tipped pins.

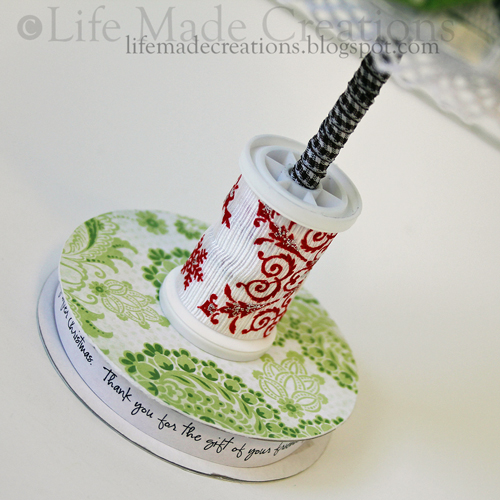
For the base, I wrapped a wooden dowel in brown gingham ribbon, used an empty thread spool covered in ribbon, and attached that to an empty ribbon spool covered in patterned paper.  This second spool also serves to hold a little sentiment for my friend.


Yo-yo's made with the Clover template come together very quickly, but the template is not necessary.  Heather Bailey has a fabulous photo tutorial here.

Thursday, December 29, 2011

Day 4: Altered Pants

Our youngest son is an Angry Birds fanatic. He was first exposed to the game last December when I bought my iPod.  It was instant love.  He has now cleared all the levels in all the Angry Birds games that exist, owns nearly all of the plush toys, several shirts, 2 keychains, a board game, some figurines, 2 posters, tatoos, a magnet set...I'm sure I'm forgetting something here.  He used polymer clay to sculpt a set of Angry Birds and pigs.  He duplicated levels with Lego blocks and knocked the Lego pigs down with Lego birds shot from a popsicle stick slingshot he glued himself.  Nearly every piece of his artwork in pre-k contained some rendition of an Angry Birds level.  He once sat and wrote a 10-page book with drawings of levels and descriptions of their difficulty that he dictated to me to write down for him.  Yup.  He is {just a little} obsessed.

Enter the pants:
While Christmas shopping this year he spotted this pair of super fluffy Angry Birds pajama bottoms in the men's department of Target.  They were a large.  In men's.  He of course insisted that I look for his size in the kids' section; complaining about the injustice of it all: "But grown-ups don't even like Angry Birds, Mom.  It's for kids.  Why don't they make them in kids' sizes?"  There are some questions in life that have no logical explanation.  

My little crafty wheel started turning in my brain wondering if I could alter these to fit him, and my sewing skill brain tried to put the brakes on the whole project and say, "Nah, you could never do that." And then I looked at my little guy rubbing his face into the pants to feel their softness and that's all it took.  I tossed them into the cart when he wasn't looking.

Altering them wasn't really all that hard, even for someone like me with minimum sewing skills.

The Task:
Turn these men's large pants (left) into a child's size small (right):
Yikes!  That's a really big difference.
The First Step:
I started with the elastic by snipping into the pocket the elastic is threaded through. I snipped right around being careful not to cut the elastic so I could reuse it.
Easy, right?  Until I realized these were really well-made pants and the elastic was sewn into the pants on the top.  And the bottom.  Grrr for well-made pants that I am using to tear apart.

So me and my little seam ripper got to be really good friends, and I tore out the stitching in both sides of the elastic.


Step Two:
Then I simply laid a pair of his pajama pants onto the Angry Birds ones to figure out where to cut.  I lined up the inseam since I wasn't going to alter that and sliced leaving about 2 1/2" for the hem and 1/2" for the side seam. I folded the hem up twice and sewed it with a zigzag stitch to catch it and then a straight stitch 1/4" below that.

Step Three:
To figure out how much elastic I would need, I just measured against his pants and snipped leaving just enough to join the ends (about 1/2" total).

And this is all I had completed that day he was at school.  I stuffed the pants into my closet for 3 weeks procrastinating the waist band.  Sometimes I make things out to be so much harder in my head than they really are.  But when I did return to this project, I had completely forgotten about taking step-by-step photos. {whoops!} So on we go, photoless.

Step Four:
The waist band.  I cut off just the bit of waist that I had hacked up to get the elastic out and folded down about 1/2" pinned and sewed.  I then folded down about an inch and stitched that to create a pocket leaving a space through which to thread the elastic.  I attached a safety pin to the elastic (a trick I learned from my mom as a little girl--see Mom, I did pay attention to what you taught me about sewing!).  Once it's all threaded, unclip the safety pin, stitch the two ends of elastic together and sew the opening closed.

That's all there was to it!  I will definitely do something like this again--beware humongous men-sized pants covered in child-loved characters!

The best part--he LOVED his new super fluffy and cuddly Angry Birds pants.

{photo coming soon}
what kind of a {crafty person} mother am I, not taking a picture of my {amazing seamstress skillz} son in his new favorite jammie bottoms?


Tuesday, December 27, 2011

Day 2: Rag Quilt

So yesterday I might have told a little lie.  

It wasn't really yesterday, it was sometime early last week when I seemingly had some time on my hands before the holiday last minute chaos of baking, final wrapping, grocery shopping and cooking.  I had really hoped when I wrote that post that I would have been writing the 12 Gifts posts in advance and just scheduling them to post each day.  Well, that was all good in theory, but truth be told, yesterday's post was the only one I had ready to go before Christmas.

So now I will be flying by the seat of my pants and writing these up each day while the three boys are home on break from school and the house needs to be undecorated and post-holiday parties need to be attended (like yesterday and tomorrow night's) and hockey tournaments need to be played and watched.  Ahhhhh {deep exhale}.  I promise I will do my best!

Now for Day 2: A Rag Quilt
 It had been a long time since I used my sewing machine for actual fabric, and forever and a day since I had made a quilt.  But this is kind of a "cheater quilt."  I won't lie and tell you that it went together quickly.  It didn't (but as quilts go, you can't get much faster than this.).  I will say that I loved making this quilt and will definitely be making others.  Why?  Because it's not difficult, there is no quilting through several layers of fabric, it's all done by machine, and my favorite part: there's NO binding!!  Oh happy day.  I loathe binding quilts, um probably because I never really learned the proper way to do it.

On with the how to.  Click here to be brought to Jera's fantastic tutorial for creating a rag quilt.

I used 1/2 yard cuts of flannel shirting and cut them to 6" square.  I am guessing that I used a yard of 6 different fabrics to create a quilt about the size of a crib (but please don't quote me on that, my math for fabric measuring isn't very good as is evident by the fact that I had to return to the fabric store to buy more fabric and also had to scrounge in my stash for some scraps of flannel.  My sandwiches were three layers of flannel with the front and back being identical patterns.  Somewhere I had read to avoid any kind of polyester-type fabrics (ie. felt, fleece, poly batting) because it does not fray well/at all.

You can't tell from the photo below, but I made my snips about every 1/4" to 1/2" (wish I had taken a photo of that).  The washer and dryer worked its magic to create this fabulous fringe look:
This blanket is soft and snuggly and perfect for my nephew to curl up with in front of a movie.

See you in a few hours for Day 3!

Friday, September 30, 2011

DIY: Camera Strap

Happy Friday!!

Tomorrow I am going on my first World-Wide Photo Walk and I'm super excited.  

But my little camera strap was a teense bit embarrassed about going out on the adventure stark naked!  Something had to be done.  

I pulled out the tried-and-trusted, never-fail-me camera strap tutorial from Cluck Cluck Sew and got to work. 

In less than 1 hour it was complete and ready for photographing:


 And Ms. Strappy is oh so very happy {hey, that rhymes}!

Hopefully I'll have some photos worth sharing with you after the walk.


Have a super fab weekend. And if you are looking for a quick project to stitch up this weekend, please try Cluck-Cluck's tute--it's sew easy.

And that concludes this uber corny post.  I'm blaming it on Friday!

Tuesday, September 14, 2010

Another day, another apron

I was thrilled to find out that my crafty apron was featured on Tip Junkie yesterday.  Well, after a bit of poking around at the other featured aprons and doing some searches  of other altered apron art, I stumbled upon this adorable little waist apron.  It's made from an old pair of jeans--seriously!  I had to make one, like right now.  So I ditched the old to do list (to do's are overrated anyway) and set straight to work on my little version.

from Kleas
First, I hacked into my jeans--these had major gashes in the knees, and I had already cut into them to make this journal. 
  • Cut across the legs just above the top of the inseam.
  • Cut along the outside of the side seams (I cut to the stitching of the pocket--see top right of photo above).
  • Cut along the waist band in the front keeping the belt loops and button in tact--see photo below
  • Sew yourself a little ruffle for the bottom.  Here's how: hem the bottom and sides of a strip of fabric.     Fold the top of the fabric to create a hem and use the longest stitch on your machine to stitch across; don't backstitch.  Knot the top and bobbin threads together at one end, then pull the bobbin thread to gather the fabric.  Easy peasy! 
    • With right sides together, pin the ruffle to the bottom of the jeans and sew together.
    • Make a *belt* to dress up the top of your apron (or use some coordinating ribbon).  Here's how: cut two lengths of fabric (mine were 2.5" x 21" but I would have done 3.25" x 30" or so).  Sew a hem on the two ends. Fold the strip in half the long way and sew along the length.  Sew one end if tube closed. Turn right side out (this takes a bit of time--watch tv).  Iron smooth.  Stitch one end under the first belt loop closest to the button (back of apron).  Repeat with other side.  Thread through loops and tie in bow.
    • Embellish your apron.  I layered some flowers and glued them with Aleene's OK to Wash It. 


     Strap on your new little apron, stick some tools in the pockets and get to work!
    Note: when I put this on to show the boys, my middle pipes up with "That looks weird, it looks like it's on backwards'  Hmmm, he may have a point...