Showing posts with label flowers. Show all posts

Wednesday, April 30, 2014

floral wall art

Hello my little blog!
Couldn't let the entire month of April slip on by with only two posts.  Not sure what happened this month, and not about to make any excuses (like maybe gorgeous weather after a looooonnnnnggg winter indoors, or spring cleaning the house, or hosting the Easter holiday, or three boys home for a week off from school, or reading, reading, reading).  But one thing is for sure, I have actually been creating some fun projects that I promise to share with you in the coming days.  There might even be a free cut-file download just for sticking through this quiet-around-here month with me.

Once in a while you make something that you just fall utterly and totally in love with.  This is one of those projects.

I used my Silhouette Cameo to cut most of the flowers using gorgeous cut files from Jamie Cripps.  You can find her amazing designs in her Silhouette Store.

Her blog contains easy-to-follow instructions for assembling each of these fabulous blooms.

I had so much fun putting them all together to fill a metal ampersand I had scored on clearance at Target.

The inspiration for this project came from the amazingly talented Cole Franke.

Thanks so much for stopping by!

Thursday, March 7, 2013

flower pot invitations

It's been a snowy and cold couple of months here in New England (surprise, surprise!).  
So I was thrilled to be able to think spring while making these invites for a little cutie's 1st birthday.

 This Silhouette cut file from Lori Whitlock made quick work of all the cutting.

Most of the papers are from the DCWV Kidlet line

Thanks for looking!

Thursday, November 15, 2012

fall wreaths

I have a new love.  

Wreaths.

This week I've been working on some home decor items in preparation for Thanksgiving.  I had a wreath idea floating in my head: a combination of three I had seen on Pinterest:

I loved the burlap base of this one:


The felt flowers on this one:


And this twine wrapped letter:


I got to work on the funnest part: the felt flowers:
{Instagram pic}
{I wanted to do up tutorials for each of these myself, but time is scarce these days so I'll just link you to some great sites where you can find similar flowers}

**white rose**
**green and grey puffs**
**yellow and blue looped**
**chocolate**

Then I found a grape-vine wreath for $4 and change (we won't discuss the tacky felt turkey that was attached to it).

I fiddled and played with the burlap--cutting strips, making running stitch ruffles, twisting and turning.  It was just not working out for me.  A quick Google search turned up this burlap wreath tutorial.  How genius is that?  A wire wreath and some burlap strips!

I cut my strips to about 4 x 10", fan folded them and skewered them onto the hanger.

And then I ran out of burlap.

Necessity breeds creativity (or maybe it's "necessity is the mother of invention").  However it goes, I was not giving up on this project.  I went to my newly organized fabric drawer and pulled out some fabric.  I tore it into 1" by 6" strips and tied 2 between each section of burlap.


A fresh coat of paint on a little wooden banner that came on the ugly turkey wreath and a scripted "welcome" and the wreath was complete!

That fabric couldn't be a more perfect match for our purple door--running out of burlap was the best thing that could have happened to this wreath!

But now I had another little problem.  What to do with all those felt flowers I had made?

Make another wreath of course!

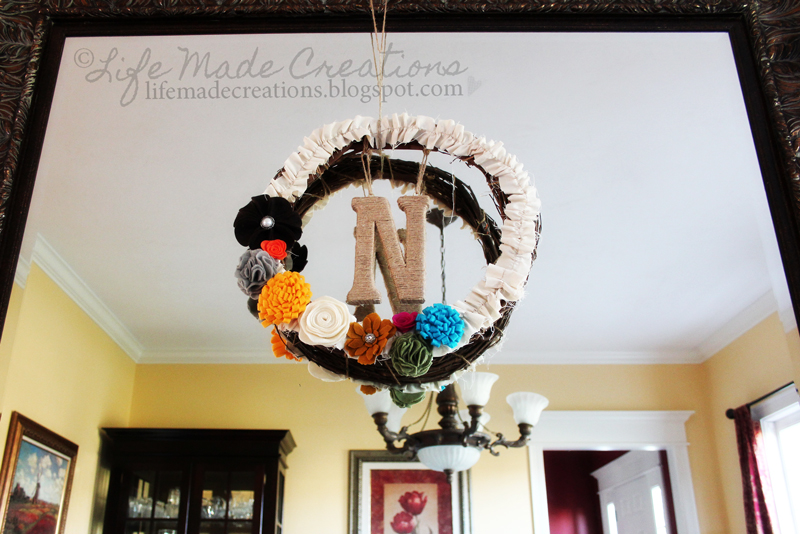
I still had the grape-vine base and a twine covered monogram.  I stitched up some muslin ruffles and hot glued it all together:


It's hanging on our dining room mirror:


Now back to more Thanksgiving prep!
Thanks for looking!


Monday, March 19, 2012

Crepe Paper Flower tutorial

I hope you all had a wonderful weekend.  The weather here was absolutely stunning.  Lots of outdoor time, windows open, sounds of children playing, swing sets, shorts (and even bathing suits for some crazy little ones!).  Days like these remind you how long the New England winters can be, and how happy some fresh air and sunshine can make you.


I've been busy working up the handmade embellishments to go into Scrapbook Heaven's April kits and I wanted to share a tutorial with you on how to make one of them.  It's been a while since I've done a tute, so bear with me!

This is the cutie we'll be making:
darling, right?

Gather up your supplies:
you will need: crepe paper, wet glue or glue gun, book page or patterned paper, brad, a little flower die, scallop punch (a regular circle would work too)
somewhere between 18 and 20" will work great


this part is important for the next step to work right.  If you forget to backstitch, just tie the two tail threads into a knot a few times.

here's where the magic happens: grab one of the tail threads (either the top stitch or bobbin thread)  on the end that you DID NOT backstitch and pull gently while working the crepe paper towards the backstitched end.
continue pulling and sliding until you have that little ruffly puff ball up there
flatten your little puff ball into a circle and glue to a card stock circle for stability 
mouse over that pic above (just learned how to do this from this easy tute)  It's like a tute inside a tute!

glue your squished circle to the center

if you use crepe paper, you'll need to die cut your little centers; crepe paper and punches are not a good match (trust me).  you could also use punched paper shapes

glue your centers--I like to stagger the petals
Stick a pretty brad through the center and...
smile cuz' you just made a cute little embellie to adorn your next scrapbook page or card!


Thanks for following along.  And if you give this a try, I'd love to see yours!

Sunday, May 22, 2011

Doily Flowers

Here's my last flower tute from the crop.  Hope you had fun!

Doily Flowers
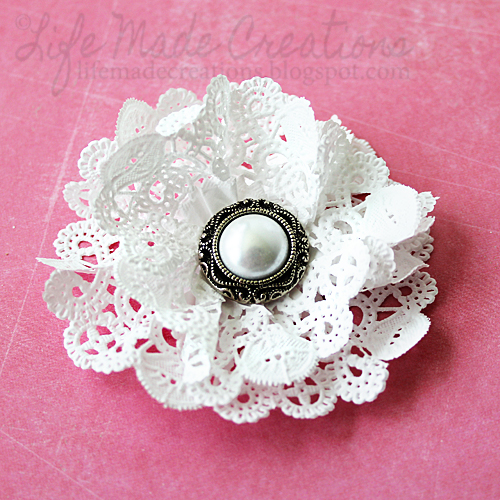
Doilies are one of my favorite embellishments for paper crafts. They're inexpensive and you can use them in a variety of ways. This flower is a "cinch" to make and can be done in a "pinch"--literally!

I used two 4" doilies for my blooms.  Cinch up the center of each doily, one just a bit more than the other.


Adhere the smaller, more pinched doily to the top of the larger, less pinched doily.  
Adhere a pretty button or other embellishment to the center.
See, told you it was easy!


You have until May 29th to link up your creation in the forum to be entered in the prize drawing!

Saturday, May 21, 2011

Fabric Flowers

Here's another flower from the Scrapbook Heaven Garden Party Crop.  Stop by to see all the blooms!

Fabric Flowers
These simple flowers are popping up all over the place.  They're super easy and can be made with any material, from fabric, to paper, to ribbon, to rick rack, to crepe paper, and beyond.

For this project, I used plain white muslin. I like to tear the fabric, rather than cut it, to create a frayed edge resulting in a more shabby chic flower. I also used some homemade mist to dye the fabric.

First, mist the strip with plain water, then mist with the ink (this helps the dye to run on the fabric and gives more coverage with less dye).

Tie a knot at one end of the strip (this will be the bud at the flower's center)

Working in a circle, twist and turn the strip of fabric around the center. I like to keep my petals loose, but play with the tension to create different looks. If you're more of a visual learner, Rhonna Farrer does a fantastic video here.

When you get the fabric the way you like it, glue it to a circle of felt or cardstock to hold it together. Hot glue or fabric glue work well.

The fun part is coming up with ways to embellish your flower centers: buttons, medallions, old costume jewelry. For mine, I used pearl tipped pins.


Have fun, and remember to link up your project here before the 29th to be entered to win a prize!

Monday, October 4, 2010

World Card Making Day

I was caught behind the eight ball with this year's WCMD, but did manage to scrape out 2 cards over the weekend (amidst my frantic and crazed reorganizing binge: three closets, my stUdio, the attic, part of a basement, the scrap paper bin--nothing was safe!  I have no idea where the organizing thing came from but I was not about to question it).

Using up some OLD Prima flowers (remember those little 'Got Flowers' in the cute mini milk bottles?).  Ran the white mat through the Swiss Dot Cuttlebug folder.

Created the flowers on this card in a few simple steps.


  1. Free cut various-sized circles from raw canvas.
  2. Paint them with a wash of acrylic paint and let dry (or zap 'em with the ol' heat gun if you're impatient like me)
  3. Layer them, add a button center and stitch them all together.
  4. Glue to ribbon stems adorned with bookprint-cut leaves washed in green acrylic.

Monday, August 30, 2010

Method Playground: Vegetation

A new challenge is up at the Playground: use some form of vegetation on your layout.  I love what the design team did with this one.  Be sure to go check out their creations.


I created those flowers with Tim Holtz's Tattered Florals Sizzix die.  I'll do a tutorial this week while the kiddos are in school, and get it posted here as soon as possible.

Thursday, August 12, 2010

Tissue Paper Flowers using Napkins

 
These napkin flowers brought me back to my childhood days of making tissue paper flowers with friends.  They are super easy to put together. Here's how:

Note: each flower only takes about 10-12 circles  
I was able to get 3 flowers from two napkins.

Image
These are super thin, one-ply napkins from Japan (thank you, Karen!).  If you use regular decorative napkins, separate the ply's and layer two patterned pieces.  You can also go retro and use tissue paper!

Image
Fold as many times as you can to fit your circle template. I ended up with 32 layers.

Image
A die cut machine makes easy work of this, but scissors will cut it, too

Image 
Doing this step adds a little more depth to the finished flower.  BE sure to do it before you separate your circles.

Image
Only about an inch of wire is needed. Poke two holes through the layers, thread wire in a loop on top, and twist in back to fasten.

Image
Take each layer separately and pinch firmly but carefully at the center base.

Image
Make a loop at the end of some florists wire, thread the wire in the bottom of the flower through this loop and twist together. You can add a bit of glue or wrap with ribbon if needed for stability.

That's it! Now go whip yourself up a whole bouquet. They're much cheaper than roses and they'll never wilt or drop their petals! Have fun.