Showing posts with label altered art. Show all posts

Sunday, June 20, 2010

Father's Day Project


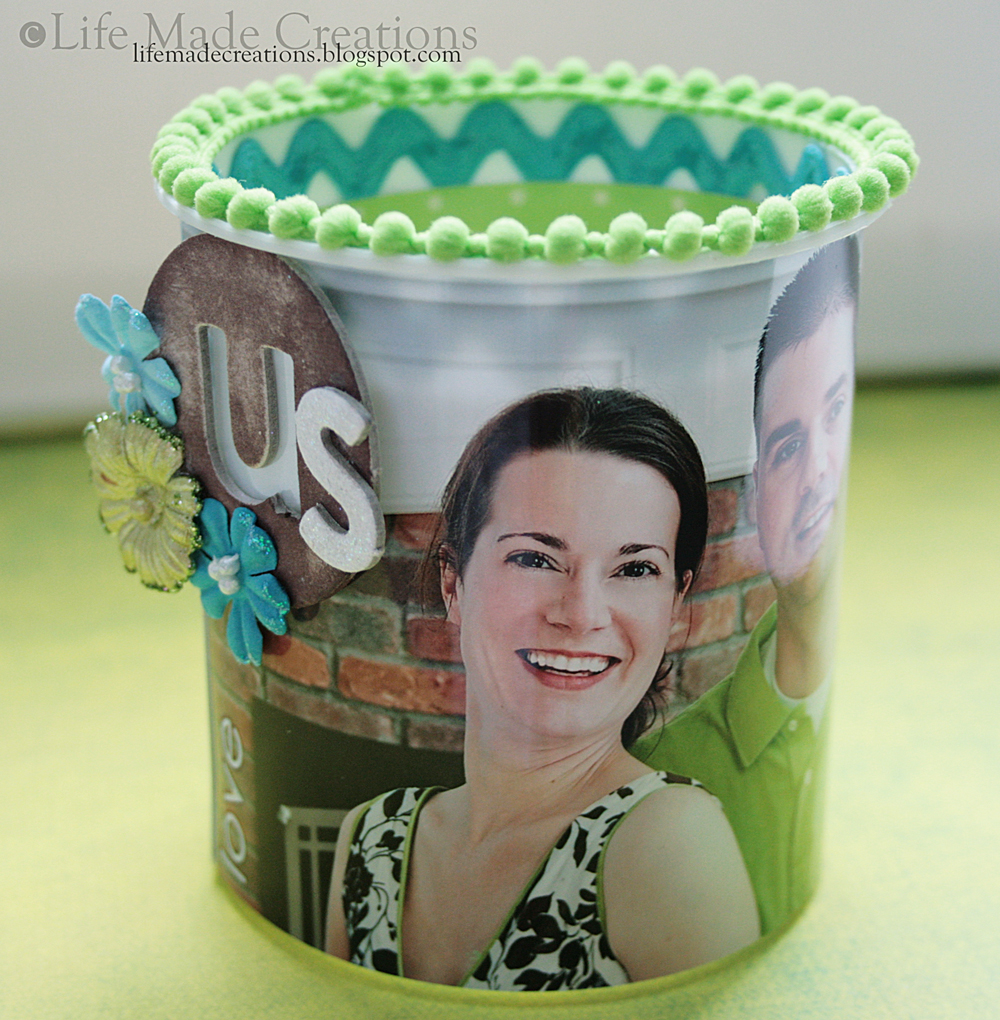
Worked on this fun little project last night, it's an altered frosting container.  I save all kinds of containers hoping to someday find a use for them, so I was happy to see Susan's Dad's and Grad's blog hop project challenge to alter a jar/can with photos.

Lots of photos of this one little jar, but I wanted you to be able to see all the way around:

Added a few rub-ons and some rhinestones
Inked the chipboard, applied glitter to the 's', added pearl centers and glitter to the petals of the paper Prima flowers

Trimmed the top with mini pom-pom fringe, and the inside with rick-rack and pp


I gave it my hubby for Father's Day, but told him that I was keeping it (afterall it matches my stUdio colors better than his office at work).  I believe his smile showed some relief that he wouldn't be the laughing stock of the firm with a flowered pen holder on his desk!  It's a win-win!

Saturday, June 13, 2009

Altered ATG

After seeing Donna Downey's altered Binderie, I was inspired to alter my ATG. Here's the before:


And here's the after:


The first thing I did was unscrew and remove the tape and uptake rolls; just two screws--I can handle that! Then I taped off the black trigger, the rubber wheel mechanism, and the inside posts that hold the rolls.


Then it's off to the spray paint. I used Krylon Fusion satin white to "prime", and then sprayed regular Krylon in Ivy Leaf. I don't have a lot of experience with spray painting, so I don't know for sure if the primer step was necessary. But my gun gets a lot of use and I didn't want the paint to get all chipped and scratched.

After all coats (2-3 of primer and 2 of color), I let it dry for a couople of days before adding the rub-ons. I used Daisy Bucket rub-ons (I love this spring-time line) and some I've had kicking around by Making Memories. Lots of rubbing, and voila! I will pick up one more pack of DB rub-ons so I can finish the back of the handle, and add just a couple more here and there. And then I will seal the whole thing with a Krylon protective finish and add a tiny bit of bling (maybe the flower centers.)

This was such a fun little project! Look around your home or crafting space and see what you can alter.

Friday, May 8, 2009

Teacher Gifts

Here are the three completed clipboards:


and a super easy, super simple thank you card:

stamps: SU! Contempo Alphabet, Spring Solitude (you)

Thursday, May 7, 2009

In the stUdio: Altered Clipboard

I'm feeling a bit behind the 8 ball these days. Teacher Appreciation week seemed to pop up out of no where, but thank goodness for inspiring blogs like this to save the day! Here's what we're making:
Ready? Let's get started!

The stuff:
  • a clipboard (mine is from Walmart, but you can get them at any office supply store)
  • a small writing pad (also from Walmart and measures 5"x8")
  • a 3"x3" Post-It note pad
  • a 3"x3" piece of cork (I think I picked these up at Home Depot? They were tiles that measured 6"X6")
  • 2 sheets of 12"x12" coordinating patterned paper
  • ribbon
  • 4 flat glass marbles
  • 4 thumb tacks
  • a clothes pin: the spring kind
  • 1/2" circle punch
  • acrylic paint and brushes
  • hot glue gun
  • Mod Podge
  • craft knife and mat
  • double sided adhesive
The How To:
  1. Paint all edges and 1" or so on the top and bottom front and back of the clipboard. This is the most time consuming part of the project as it took 3 coats to get descent coverage (I'm not good at the waiting-to-dry-between-coats thing). You can skip this part, but I like a nice finished edge for where the paper will not quite cover the board.
  2. Use the Mod Podge (although I like to pronounce it Modge Podge like my Mom does, it's more fun to say that way, don't you think?) and paint on a nice thin even coat to the back of the board. I was out of the regular Modge, so I had to use this brushstroke kind--it's a lot thicker, and harder to spread--don't recommend it for this project but it's great as a sealer over your paintings or photographs to give it that oil painting texture. I digress; onto step 3.
  3. Use a brayer to smooth out the paper and any air pockets and ensure good adhesion. I think I have the world's smallest brayer. I purchased it at a speciality stamp store in Kennebunkport, Maine back in college. Goodness, I think my ADD is coming out in this post! Anyways. . .step 4 is next.
  4. Use a craft knife and mat to cut off the excess paper (don't throw this scrap away, we'll be using it soon). Repeat on the front side of the board. I allowed my paper to cover right over the hardware clip at the top of the board. It saves me from having to trim carefully around it.
  5. Embellish the clothes pin: disassemble a clothes pin and use a piece of paper from that scrap and some more Modge Podge to cover one side of the wood.
  6. Use your craft knife to slice out the little strip of paper where the spring will fit.
  7. Reassemble the clothes pin and give yourself a pat on the back if you are not bleeding. You just completed the very most difficultest part of this project. If you are bleeding, get a BandAid and hang in there--it's all coasting from here!
  8. Make your marbles: Using one of the paper scraps leftover from step 4 and a 1/2" circle punch, punch four circles. Adhere these to the underside of the marble (I like to use the mini Xyron for this). Be sure to put your adhesive on the picture side of the paper.
  9. Use a glue gun or some other strong adhesive (ie. Gorilla Glue) to afix the marbles to plain thumb tacks.
  10. Cut a strip of that same scrap to cover the top binding on the note pad. Adhere in place.
  11. Using a hot glue gun adhere the cork, Post-It pad, and clothes pin to the bottom part of the board. Clip the note pad into the clipboard.
  12. Last thing--Make the pen: cut a piece of that same scrap about 1" wide and as long as the pen barrel (mine was 3 1/2"). Curl the paper and slip into the barrel of a clear pen.
Isn't this too cute? One down, two more to go!

Tuesday, March 24, 2009

All in a night's work

Today I received the Rolodex I ordered last week. I am very excited to finally contain all my phone numbers, addresses, and other such info in one place. There is something nostalgic about a good, old-fashioned paper and pen type of organizer that I don't ever have to worry about crashing or getting a virus. But after copying lots of info onto those little cards, it just didn't look quite right. So after a bit of looking and pondering, measuring and cutting, stamping and gluing I took my Rolodex from this:


to this:

in just a couple short hours (it would have been less, but I was checking email, blogs, and Facebook in between!) Here's the gist of what I did:

  1. Cut divider cards to size (mine were 2 5/8 x 4"--perfect for getting 3 out of 1 strip of 12" paper) I used some K & Company double sided paper designed by Amy Butler that I've been saving for just the right project.
  2. Using a 1/4" square punch and rectangle punch, you can create the notches for the cards quite easily. Apparently there's also a punch specific for this task, but I don't have that. Simply line up a card that came with the Rolodex against your new cut card and punch away--very easy.
  3. Use the same designer paper to punch tabs for the letters using SU!'s Round Tab punch. I stamped my letters with a new alpha set I purchased just yesterday for only$1.97 on clearance.
  4. Adhere the tabs to the cards and pop into place on the Rolodex.
  5. I also punched 2-2" circles from the paper and adhered it to the knobs for a little more pizzazz. Isn't it adorable? And it was just the splash of color needed to make it into a happy, and useful desk accent!
If I knew anyone that was moving (and I'm glad I don't) this would make a great going away gift filled with addresses of friends and family. Wish I had thought of this in time for my cousin's shower the other day--it's perfect for a newly married couple. Or a graduate, or teacher, or friend who landed a new job. Or heck, just make one for yourself! But don't make the mistake I did and order it online. I saw the same exact thing today at Walmart for $7 less than what I paid--I hate when that happens! Have fun with it!