Showing posts with label tutorials. Show all posts

Thursday, November 12, 2015

crochet : christmas baubles


Hello, friends!  Thanks so much for popping in.  
Yesterday, here in the States, we observed Veterans' Day to honor the people who serve in courage to protect our country and freedoms that we so often take for granted.  I spent the mid-week day off from work hooking up some Christmas baubles.

They are super fun to make and work up fairly quickly.  I am excited to make bunches of baubles to give as gifts this holiday season.  

If you would like to hook up some of your own, I am happy to share the pattern with you:

Materials: size F hook, dk weight yarn (or light weight worsted), 3" glass or plastic ornament bulbs
Finish each round with a slip stitch join and fasten off.
round 1: in a magic circle, ch3, 11dc {12dc}
round 2: working between each dc from round 1 (not in top of stitch) work 1 hdc, ch1around {12 hdc, 12 ch1 spaces}
round 3: 3dc cluster, ch 1 in each ch1 space. (YO, insert hook in space, pull up loop, YO, pull through 2 loops, repeat 3 times, then YO pull through all 4 loops) {12 3dccl, 12 ch1 spaces}
round 4: sc in each of the 2 stitches of the clusters (the large stitch of the cluster & the chain stitch), dc in space between stitches {24 sc, 12 dc}
round 5: dc in each of the 2 sc from rnd 4, ch1 sk dc (24 dc, 12 ch1 spaces}
round 6: 2hdc in ch spaces, 1hdc between 2dc from rnd 5 {36 hdc)

Make 2 and don't fasten off the final round of the second medallion.  Weave in all ends.  
Place the two sides together, right sides facing out, and slip stitch all the way around to join.  Go around about 3/4 of the way, insert the bulb and continue slip stitch joining.  


I gave a full tutorial on Periscope and the replay from Katch is embedded below.
You can check out the rest of my crafty Scopes at Katch.
Join me on Periscope for more crafty scoping fun!


Friday, September 12, 2014

woodland bookmarks: a silhouette tutorial

I was searching for a cute little token to give my kindergarten students for the end of the school year.  Searching for "bookmarks" on Pinterest turned up these little cuties at EllinĂ©e:
photo credit: www.ellinee.com
They were designed by the talented Lia Griffith
I downloaded them (they're free!), and opened the file with my Silhouette Studio Designer Edition software.  From there, I was able to turn them into print and cut files using the trace feature:

How to: uncheck High Pass Filter; dial threshold up to 100% (or there abouts); select Trace Outer Edge.

Next, I added my text in the color and font of choice using the text and line color tools:

Then, tell the Silhouette not to cut your text:

How to: go to the Cut Settings menu; select the text in your project and select "no cut" in the Cut Style options.

Lastly, place your print and cut registration marks and move your project to fit (avoid placing anything on top of the shaded sections):

Using the Print and Cut option, send it to the printer, then to your cutter, and you will end up with the cutest batch of personalized woodland bookmarks ever!
To add some stability, I backed mine with tongue depressors and "laminated" them with heavy duty clear packing tape.

Monday, May 26, 2014

{ crochet } a banner


There's something about banners that puts a happy smile on my face.  This little project combines three of my happy's: banners, crochet and rainbows!
It is made of single crochet triangle motifs trimmed in a scalloped edging.  

In case you would like to make your own, here's the pattern I made up as I went along:

Triangle:
I used an F hook (3.75mm) for the triangle, and a D hook (3.25mm) for the edging.
ch2, sc in first ch made, ch1, turn (2 stitches made)
sc in same stitch, sc in each of next 2 stitches (3 stitches made)
Continue this way, increasing by one stitch in each row until you have 20 stitches.

Here is a close-up of where you will put the last stitch in each row before doing the ch1, turn.  You will see 3 horizontal loops and then a vertical loop.  Insert your hook at the vertical (arrow) to make the last sc in each row.

Fasten off and weave in ends.

Trim:
Along the edging you will see small holes created from the first chains in each row (9 clearly visible on each side). Use this photo as a guide for where to work your edge scallops:

Join trim color to top left corner of triangle and work 1sc, 1hdc, 1dc, 1hdc, 1sc in each hole along edge (10 scallops in all).
Continue working 10 scallops up the other side (shown above with black dots).
At top of triangle, work a sc in each stitch across (20 total).
Ch1 and work another row of sc.
Fasten off and weave in ends.

Continue making triangles until you have as many as you like.  I recommend blocking them--it just helps them lay nice and flat when hanging.

Joining the triangles:
I created a separate piece and stitched my triangles to it.  You may come up with a more genius way of joining them, but I went with what was easier for me.  
To figure out the length:
I led with 20 chains on each end, 10 chains in between each triangle, and then 20 for the length of each triangle.  So for my 5 triangles, I needed a chain of 181 = 40 (ends) + (20 x 5) + (10 x 4) (plus 1 for turning ch)

Ch181, work a sc in each chain across (180).
Fasten off.
Using a whip, stitch attach each triangle to the length.  I used stitch markers to temporarily and evenly attach my triangles for stitching.
Weave in all ends and hang your new banner!

Currently, ours has made his home in our guest bathroom:


Happy Crocheting!

Tuesday, April 1, 2014

purse to camera bag tutorial

Last week, I spent part of one of my days off making some custom-fit padding to turn a purse into a camera bag.  

And now I finally have a moment to share the how-to with you!

It all started with this bag I picked up on sale at Target
Originally,  I thought the front pockets would be perfect for holding lenses.  The problem: this purse lacked any type of padding to protect my little camera from bumps and bruises.
A quick search on Pinterest turned up a few tutorials that seemed easy enough.  Mostly I followed this one from Make It & Love It.

I started off with a trip to my local fabric and craft store to pick up some coordinating fabric, padding, and Velcro.
 The padding I chose is Fairfield's Soft n Crafty NU-Foam premium densified batting.  

Start by cutting a piece of pad to fit the bottom of your bag.  I just lined the pad with the bottom outside of the bag and snipped for the length and width then continued cutting at the snips to cut the entire rectangle.
Then cut a length of pad to fit the entire perimeter of the inside of your bag--I had to cut mine in two sections due to the size of the padding.

Dry fit the pad into your bag and make adjustments if needed.

Next, cut the fabric large enough to cover your pad pieces.  I left a good inch around the edges and cut along a fold to give a nice finished edge (and to have less to sew).

Before you sew the cover of the perimeter pad, you'll want to stitch on your Velcro strips.  I placed the strips (soft side) so they would be on the long sides of my bag and sewed around the entire edges of all four strips.

Fold fabric pieces right sides together and stitch, leaving an opening to turn your fabric and insert the padding.  Do this for both the bottom and side pieces.

To make the dividers, I followed Make It & Love It's directions (and forgot to snap pics!).  I didn't even bother stitching the base to the sides because I'm a lazy hand-stitcher it all stays together snuggly once inside the bag.
This project took under 2 hours (it would have been a lot faster, but my sewing machine and I had a couple of battles and I had to show it who was boss).  I'm thrilled with the result of a cute and trendy camera bag without the boutique price tag {materials: $15 + bag: $20 = total cost: $35}.

Happy Sewing!

Wednesday, December 11, 2013

top dog dies: blog hop!


Hi and welcome to the next stop on the Top Dog Dies blog hop!
If you're just starting out, be sure to read the bottom of this post to enter the awesome giveaway from Top Dog Dies and find links to the rest of the design team's amazing projects.

Today, I'll be sharing a pretty beaded ornament:

Gather your supplies.  You'll need the Trio Snowflakes die, some papers and card stock, beads, twine and glue.

Cut 5 of each snowflake.

Fold each one in half.

Glue each layer together at the center leaving the edges loose.

Glue the back of each edge to the back of the next, lining them all up on the folds.  Glue the final edge to the first edge to create a circle.

Thread some twine through the center.

Tie a knot at the top leaving a loop for hanging and tuck the knot inside the center seam with a dab of glue.

Thread some small beads at the top, and some larger beads at the bottom of the ornament.

Hold it up to the snowy window to appreciate its glittery sparkle.

Contemplate making dozens more to give as gifts to teachers and staff, neighbors, coworkers, etc.
(then if you're like me, conclude that that's just crazy talk, and just make one)

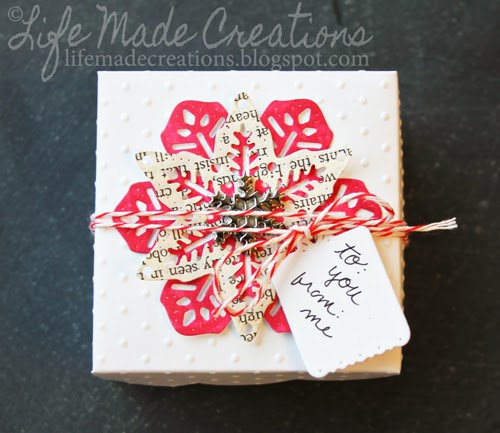
Since it's going to be a gift, it will need a coordinating gift box for giving.

Use the Scallop Box Die and create a box with the same papers and a tag from Darby Doilies and Tags.

Tie it all up with some twine and give to someone special.

Thanks so much for hopping over.  Hop on through each DT member’s blog to get the details on their fab creations:


                                                                   Michelle Neddo <------you are here   
Angela Bode
Shellye McDaniel


The party isn’t over just yet, though: We’re giving away $50 Top Dog Dies eGift Cards to two lucky winners. Entering is easy: Just add your email address here and you’ll be included in the giveaway!

You can earn extra entries by commenting at each stop along the blog hop and by following Top Dog Dies on Facebook, Twitter and Pinterest. Even better news? You have until Friday Dec. 13 to enter and we'll announce the winners on Monday Dec. 16.
Thanks for joining us for our first – but definitely not our last – blog hop. 
Happy hopping!

Tuesday, October 8, 2013

embroidering with dies

I am so excited to share this idea with you! 
I happened upon a little discovery that marries die cutting and embroidery--a match made in heaven, right?  And what's even better: this little discovery eliminates the need to trace or otherwise transfer patterns from paper to cloth.


You will need:
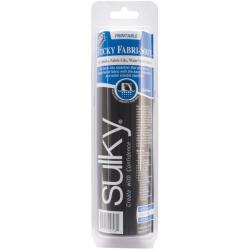
Sulky Sticky Fabri-Solvy
A pretty little die like this one from Top Dog Dies
Snowflake Trio die set TC015
I learned about the Fabri-Solvy material from embroidery queen Wild Olive in this post.  So I picked up a roll to try it out the way she described.  Then I received my box of goodies from Top Dog Dies.  Hmmm...I wonder...Can you hear the wheels of creativity turning?

Here's what you do:
To cut the Sulky material, place the fabric side towards the die cutting edge (paper side touching the cutting mat) and run it through your die cutter.

Using a pin or needle, weed out the cut pieces from the die cut piece while it is still in the die:

When it is all weeded like this

carefully remove the Fabri-Solvy from the die, peel off the paper backing to reveal the sticky side, and adhere it to your fabric.

Stick it in your hoop, and begin embroidering in the negative die cut spaces.


When you're finished stitching, simply peel off the Fabri-Solvy and admire your creation.  Sew easy!

I only embroidered inside the negative cut outs for this design, but I think this technique would work for a variety of die designs because you could stitch the outlines of the shapes.  You can even stitch through the Sulky material to add details to your project.

I hope you will give this a try.
Thanks for visiting!