Wednesday, October 9, 2013

top dog dies--two cards

Today I have a couple of cards to share with you using some Top Dog Dies.


TDD dies make easy work of fancy card making.  This card only took about 20 minutes to put together using these three dies (click on picture to go shopping):
Frame Front Square Card die TW044
Darby Doily & Tags die set TC025

Birds and Nest TC034

To create the multi-colored bird and nest embellishment, cut the entire die twice, once in brown for the base layer, once in green for the leaves.  Then use tiny bits of colored paper to cut the birds and nest in one pass through the die-cutter.

Trim the pieces and assemble onto brown base:


Outside reads: "Congratulations on your new nest."
Inside the card:

The second card was even simpler and quicker to make.
Using the Snowflake Trio die set  and a portion of this die,
Madison Broder die TC020

I whipped up this card in no time

 The intricate details these dies can cut is simply amazing!

And I love the little dots and dashes added to the die to create texture.

Thanks so much for letting me share my projects with you.  
Tomorrow I have a couple of gift holders to show you.

Tuesday, October 8, 2013

embroidering with dies

I am so excited to share this idea with you! 
I happened upon a little discovery that marries die cutting and embroidery--a match made in heaven, right?  And what's even better: this little discovery eliminates the need to trace or otherwise transfer patterns from paper to cloth.


You will need:
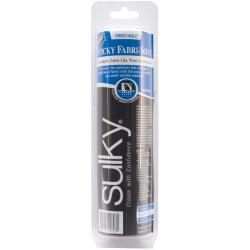
Sulky Sticky Fabri-Solvy
A pretty little die like this one from Top Dog Dies
Snowflake Trio die set TC015
I learned about the Fabri-Solvy material from embroidery queen Wild Olive in this post.  So I picked up a roll to try it out the way she described.  Then I received my box of goodies from Top Dog Dies.  Hmmm...I wonder...Can you hear the wheels of creativity turning?

Here's what you do:
To cut the Sulky material, place the fabric side towards the die cutting edge (paper side touching the cutting mat) and run it through your die cutter.

Using a pin or needle, weed out the cut pieces from the die cut piece while it is still in the die:

When it is all weeded like this

carefully remove the Fabri-Solvy from the die, peel off the paper backing to reveal the sticky side, and adhere it to your fabric.

Stick it in your hoop, and begin embroidering in the negative die cut spaces.


When you're finished stitching, simply peel off the Fabri-Solvy and admire your creation.  Sew easy!

I only embroidered inside the negative cut outs for this design, but I think this technique would work for a variety of die designs because you could stitch the outlines of the shapes.  You can even stitch through the Sulky material to add details to your project.

I hope you will give this a try.
Thanks for visiting!

Monday, October 7, 2013

top dog dies: sewing canvas

When I received my shipment of dies from Top Dog Dies, I was so excited to get started playing.
I immediately got to work with some sketches for project ideas.


And as soon as I saw this die set,
Top Dog Dies: Sew Much Fun die set TC019
I knew I wanted to make a little canvas for my friend's new sewing room in her newly renovated 1800's home.

I prepared the background with some gesso and used bubble wrap to "stamp" some pink dots.

Then I die cut the shapes using mostly papers from American Crafts' Dear Lizzy line.
I am amazed at how detailed the Top Dog Dies cut.

Then came the fun part of arranging the pieces to fit.

Some bits of floss and baker's twine, some ribbon, and a few brads to embellish it all.
I wrapped the canvas edge in washi tape, and dressed up the back with more washi and a piece of patterned paper.

 A cute little canvas to adorn her sewing room wall!

 Thanks for visiting!  I'll be back tomorrow with a super easy way to use dies for your embroidery projects.

ps. This little project is currently featured on the home page of the Top Dog Dies website!


Saturday, October 5, 2013

top dog dies

Just popping in to share a bit of news.
It's here!--AccuCut's brand new online store:

They are not only carrying their own line of intricate-cut, wafer-thin dies and large steel-rule dies, but also many popular styles from well-known brands.

Go check out their new site at

www.topdogdies.com


This is the new company I am so grateful to be designing for.
I can't wait to share the projects I created for the launch with you over the next week.

Here are a few sneaks:


This one will be a tutorial.  If you embroider, wait until you see this! 

Have a fantastic weekend!

Wednesday, September 25, 2013

embroidered crochet cozy

Happy Fall!
I'm so ready for fall--ready for chilly mornings, sun-shine warming my face, blue jeans and sweaters, apple crisp and the gorgeous colors of autumn.

And after all those things, my favorite thing about fall?  Starbucks Pumkin Spice Lattes!  Oh, sweet Heaven in a cup.

Sweet Mollie at Wild Olive shared a free embroidery pattern for a cutie little PSL.  I thought it would  be just perfect on a crocheted coffee cozy:

So I stitched one up last week. But then I met up with my sister and she was drinking her Pumpkin iced coffee from that "other" coffee shop {blehhhh!}.  I gave her the cozy so her little hand wouldn't freeze off.  And besides, if she insists on drinking that substandard coffee, the least she can have is a cute cozy around her cup. (Love you, Sister, even if your choice in coffee is yucky!)


So this week, I stitched and hooked a cozy of my very own.  And of course, once I was finished, I had to treat myself to a Starbucks PSL.


ps.  I have been working on lots of projects for the new design team I am on.  It is killing me not to be able to share them here, but as soon as I can, I will.

Hope you are all enjoying your fall so far!